Upon entering your office, you hear beeping from your NAS. You log in to DSM and see that there is an alert that a drive has been removed, causing a System Partition Failure.
The problem is the drive was never removed. To get the missing drive to show back up again, you reseat the drive. After removing and reseating the drive it now shows up in DSM. Initial scans show the drive as healthy. So, what gives?
I’ll reveal the problem and what I did to solve it below.
Table of Contents
More Context to the Disappearing Hard Drive
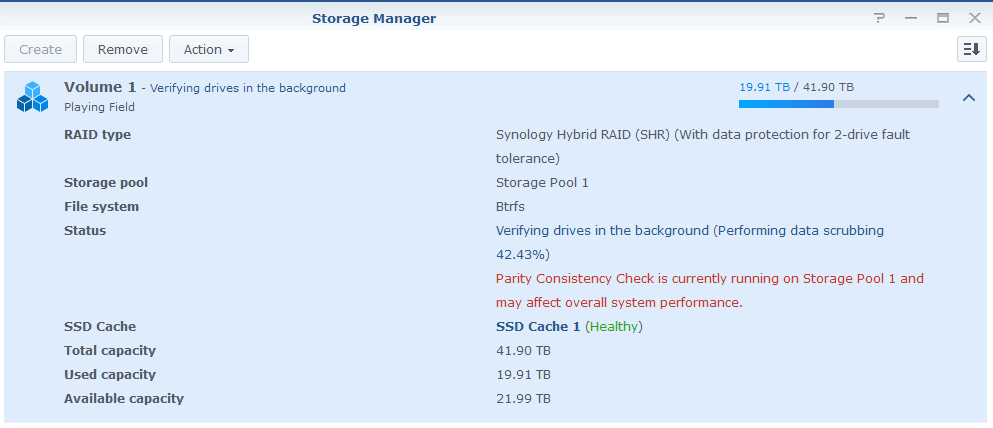
I have 5 equally sized NAS hard drives configured in Btrfs at maximum redundancy. I have max recommended RAM and 2 NVMe SSD cache drives.
After the drive was found and scans have been completed, it was time to repair the array. A Parity Consistency Check for the drives of my size will take hours.
So what could have caused this? I have two theories for events that happened.
- Virtualization Station may have caused this. I had this enabled while constantly running a Windows Server 2019 VM for mild CPU tasks. Perhaps I was peaking resources often enough to interfere with legitimate NAS operations.
- Bad shutdowns probably caused this. I have had 3 power outages within a few months that could have caused data integrity issues due to improper shutdown.
I’ve had this disappearing hard drive problem happen twice. I thought I would have to RMA the hard drive. I would have done so if this problem happened again. After deleting the VM, I removed Virtualization Station and bought and set up a UPS. I haven’t had the problem since.
How to Check the Status of the Rebuild
You have already started the rebuild but you want to know how long this type of operation will last. The rebuild will take a long time, so how would you check the status?
In the Storage Manager, you will see a percentage completion in the Status field. This, however, does not give you any semblance of time remaining. The good news the system does calculate the time remaining. The bad news is the number is hidden and you can only reveal it by establishing an SSH session.
How to Establishing a SSH Session With Your NAS
- Open your SSH client.
- For Windows, use Putty.
- For Mac, pick one of these SSH clients.
- Make sure the SSH radio button is selected.
- Put the IP address of your NAS in the destination input.
- Connect and log in with your username and password with admin privileges.
- The command you will run does not require logging in as root, but you do need a user that has SSH access, which is usually the admin anyway.
- Type or paste one of these commands:
cat /proc/mdstatorwatch cat /proc/mdstat - If necessary, you can use CTRL + C to quit the current process.
- Type
exittwice to logout.
What Is MDstat?
Each volume is listed with mdstat, or Multiple Devices, meaning the volume can be made up of many drives. It is possible to see multiple MD designations rebuilding simultaneously. This process can happen without interruptions to other NAS tasks.
Common Questions When Rebuilding Your Synology Drives
The following answers basic questions about the rebuilding process.
Parity Consistency Check Reached 100% and Then Restarted. Is This Normal?
You have finally seen the status of your rebuild get to 100% (especially in the GUI) and then it started over! AHH!
Don’t worry. Sometimes the check will go for another round. Additionally, not all disks will take the same amount of time. Some disks will be mirrors and another will be striping information.
The difference between drives that have been completed versions ones that haven’t come down to resync=DELAYED. If you see that at the bottom of the MD entries, you know that they haven’t completed the parity check yet. This just means it is still in the queue. You will need to get to 100% on every MD0 through MD6.
What If You Don’t Have a Rebuild Status or Percentage?
After starting the repair process, the status just shows Repairing (checking parity consistency) without a percentage of completion.
Don’t worry, your NAS is still doing its thing. You can still check /proc/mdstat to get some information.
Additionally, you can check Storage Manager > Volume > Volume Name.
If Storage Manager still doesn’t show it, it will eventually appear as a percentage progress indicator later.
Why Does a RAID Rebuild Take So Long?
This really depends on your setup. Rebuild times vary on all RAID devices, especially if the device is still in use. This is why I originally thought Virtualization Station was giving me issues. Read speeds, write speeds, processor speeds, and RAID processor speeds (if you have a dedicated RAID card) all factor in how long a rebuild will take.
Even the RAID type will affect how long the rebuild takes. To estimate time remaining, consider the following, assuming you have 2TB drives:
- 2TB = 1.6e+7 mbits (roughly 16,000,000 mbits).
- Assuming a 25 mbit/sec write speed.
- It will take nearly 18 hours to fully write 2TB worth of hard drive data.
If I remember correctly, my 8TB drives took around 24 hours so it was cruising along faster than this example.
Regardless of how much data you are storing, parity is for the whole volume. Each disk have multiple partitions as well. However, the additional partitions include OS and swap partitions, which are relatively small and do not take as long to go through.
Can I Replace Other Drives While RAID Array Is Rebuilding?
You can, but should you? No, I wouldn’t risk it.
If you are upgrading drives in your NAS, that’s great. But don’t try to replace other drives while the first one is in the Repairing, checking parity consistency is running state. Doing so could potentially land you with an unrepairable array.
What if I Need to Cancel the Rebuild?
Rebuilds take significant resources to perform. Although you can still use your NAS, your performance can potentially be degraded.
If you need to stop because of other system and network operations, try to cancel them instead of your NAS rebuild until your rebuild is finished.
If you go to Storage Manager > Volume > Action Button you will most likely see that you can’t pause this type of operation. You can usually pause other normal volume operations.
If you need to cancel the rebuild because you may lose power, you can power off your NAS if you need to. After you power it back on, your rebuild will normally start from scratch as mentioned in this community post.
That post also issues a warning. Although you may be just fine, you still risk losing data:
Just for clarification – generally speaking we are not expecting any errors if the DiskStation experiences a power failure during RAID expansion or volume expansion – however shutting down the DiskStation during RAID reshape is the same as shutting down the DiskStation unsafely – which can result in lost of data. If you’re using a DS1010+, with 3GB of memory, plus 5 HDDs, with 64MB cache, you’ll have the potential of losing 3.38GB of cached data, if it wasn’t flushed to the HDD during the reshape.
Can I Restart DSM While Rebuilding a Drive?
A safe shutdown is always better than a power loss. As mentioned previously, you can shut down your NAS and will usually be able to start the parity check again after boot. But what about an actual restart?
If you try to restart your NAS, you may see the following message:
The system is processing the following task(s):
Operations on volumes are in progress
Please try again later.
DSM may prevent the reboot so your choices are to wait or power down, cross your fingers, and try again later.
Another Important Storage Task – Data Scrubbing
You really should enable data scrubbing. You can run it manually by doing the following:
- Launch Storage Manager.
- Go to Storage Pool > Data Scrubbing.
- Select the storage pool on which to perform data scrubbing.
- Click Manual Run from the Action drop-down menu.
Better yet, set a data scrubbing schedule:
- Launch Storage Manager.
- Go to Storage Pool > Data Scrubbing.
- Click Set Schedule.
- Tick Enable Data Scrubbing schedule.
- Specify the Frequency, Start date, and Time Session.
- Go to the Select Target tab.
- Select the storage pool on which you want to perform data scrubbing.
- Click OK.
To see why data scrubbing is important, check out How data scrubbing protects against data corruption from the Synology blog.
If You Need to Replace Your Hard Drive
If you need to replace your hard drive(s), be sure to get NAS-rated drives from a reputable manufacturer.
Western Digital
- WD Red Pro
- WD Red Plus
- WD Red
- Main WD Download Page (All Others)
Final Thoughts
While you are at it, look at getting a UPS. They are cheap enough these days. Try to get one your NAS can communicate with so it can shut itself down when there is a power loss.